【Swift】UIImageViewでアニメーション
どうも、ねこきち(@nekokichi1_yos2)です。
画像を連続で表示させる - アニメーションと言えば、GIF、が思い付きます。
しかし、GIFを作ろうとすると、
- 用意した画像をGIFに変換
- アニメーションを録画してGIFに変換
するなどの手間がかかります。
そこで、GIFを使わず、 UIImageだけでアニメーションを作る方法を書いていきます。
解説
手順は、下記の3つ。
- 画像を用意
- 画像を配列に入れる
- アニメーション開始
画像を用意
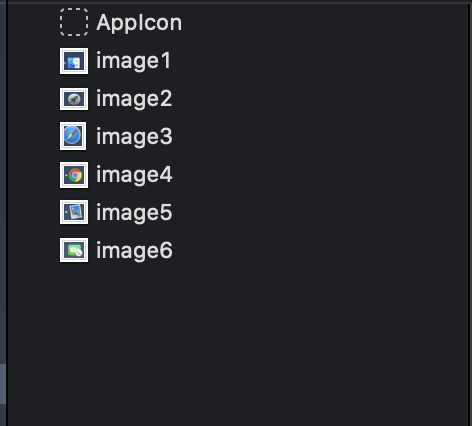
Assets.xcassetsに画像を全部突っ込みます。
↓
画像を配列に入れる
UIImageを格納できる配列を用意します。
↓
var images = [UIImage]()
用意した配列に画像を入れていきます。
↓
//アニメーションで流す画像を格納していく
for i in 1...6 {
    images.append(UIImage(named: "image\(i).png")!)
}
(用意した画像の名前を統一すれば、たった数行で済むので、おすすめです。)
アニメーション開始
前提として、UIImageView(ここでは、image、の変数名)を用意してください。
アニメーションを開始するには、2つの方法があります。
まず1つ目。
//アニメーション用の画像を設定
image.animationImages = images
//Duration:何秒以内にアニメーションをさせるか
image.animationDuration = 3.0
//アニメーション開始
image.startAnimating()
アニメーションを止めるには、
image.stopAnimating()
を書くだけ。
(ただし、最初の画像から再びアニメーションが開始する)
また、
//Bool値
image.stopAnimating()
でアニメーション中かを判別可能。
そして、2つ目。
//Durationを指定、アニメーション開始
image.image = UIImage.animatedImage(with: images, duration: 5.0)
注意点として、停止できない..。
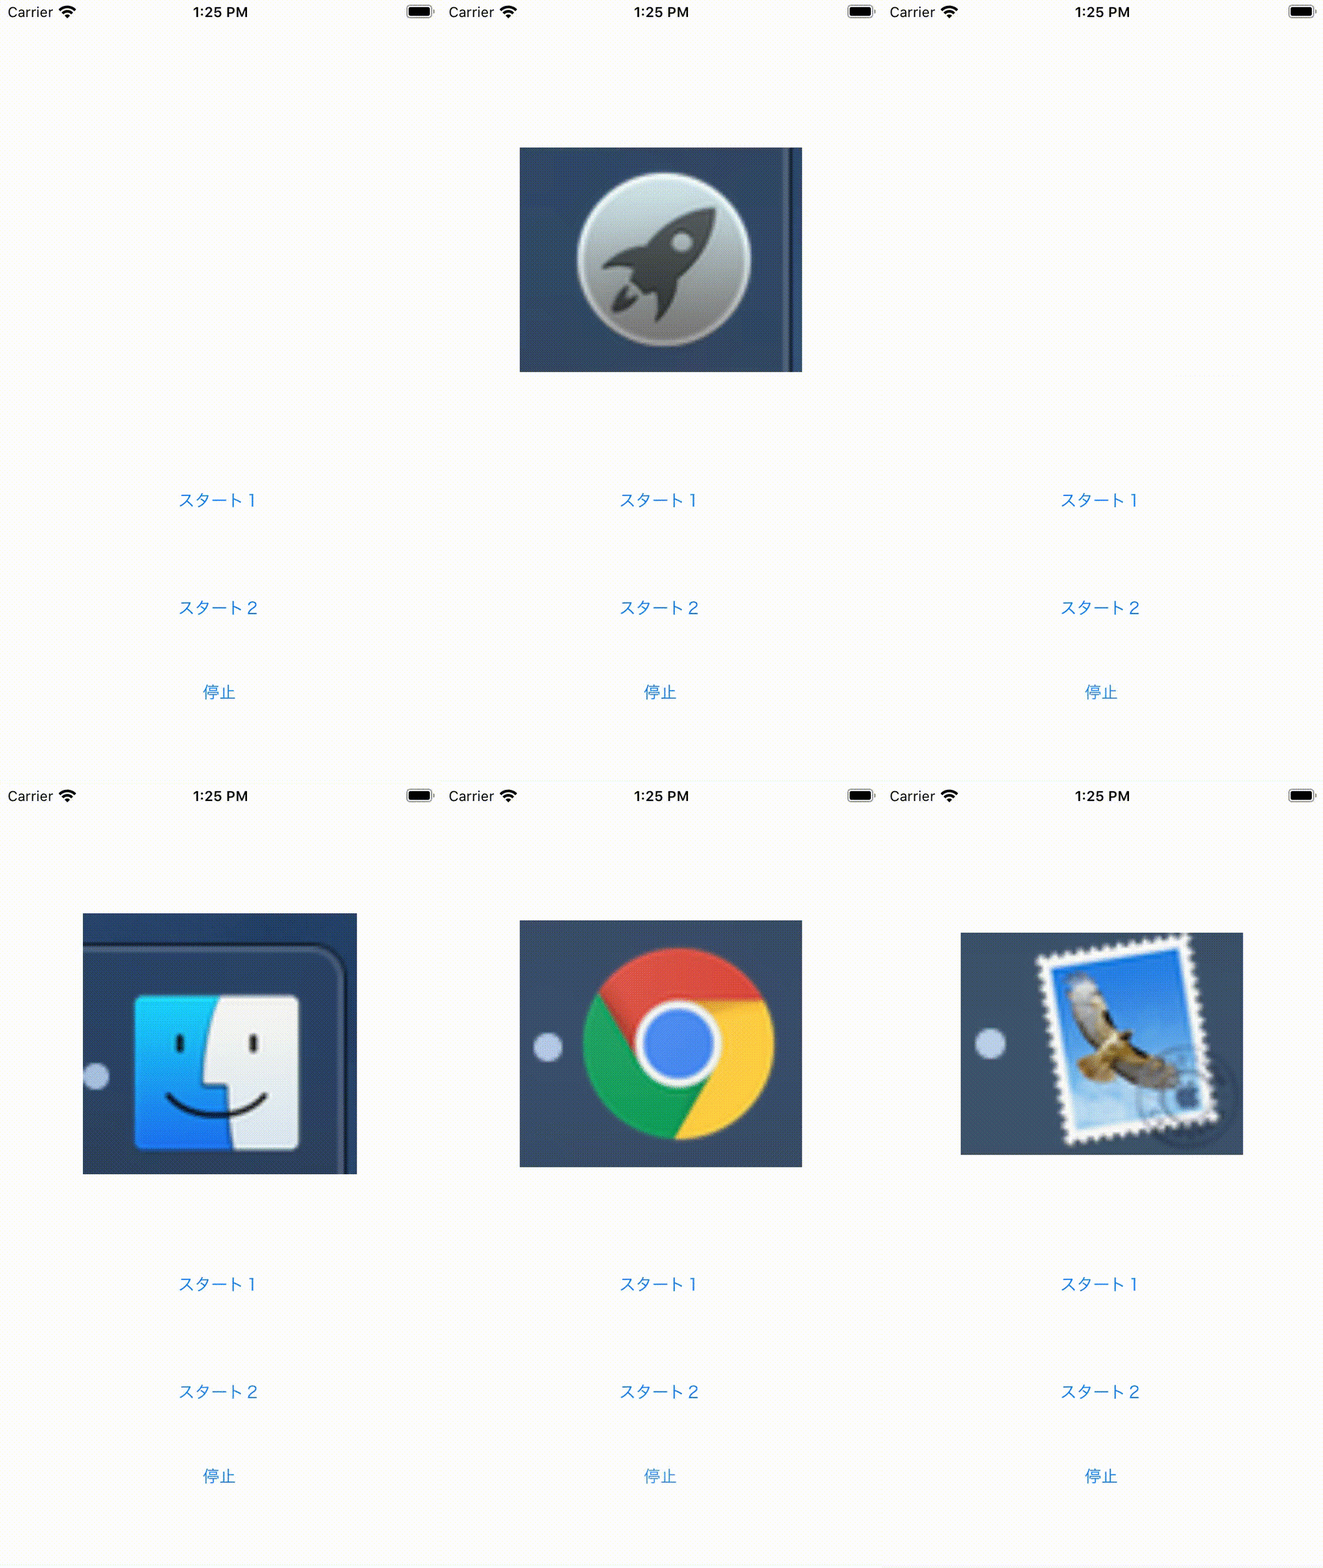
結果
ソースコード
import UIKit

class ViewController: UIViewController {

    @IBOutlet weak var image: UIImageView!

    var images = [UIImage]()

    override func viewDidLoad() {
        //アニメーションで流す画像を格納していく
        for i in 1...6 {
            images.append(UIImage(named: "image\(i).png")!)
        }
    }

    @IBAction func start1(_ sender: Any) {
        //ポーズ中のみ
        if !image.isAnimating {
            image.animationImages = images
            image.animationDuration = 5.0
            image.startAnimating()
        }
    }

    @IBAction func start2(_ sender: Any) {
        if !image.isAnimating {
            image.image = UIImage.animatedImage(with: images, duration: 5.0)
        }
    }

    @IBAction func pause(_ sender: Any) {
        //アニメーション中のみ
        if image.isAnimating {
            image.stopAnimating()
        }
    }

}
参考
【Swift】SDWebImageで新しい画像が反映されない問題
どうも、ねこきち(@nekokichi1_yos2)です。
FirebaseのSDWebImageでStorageに新しくアップロードした画像が表示されず、更新前の画像が表示されてしまう問題の解決策を書いていきます。
解説
原因は、ローカル(デバイス?)に保存されたキャッシュにあるようです。
なので、
- キャッシュを削除
- キャッシュを更新する
の方法を使えば解決します。
キャッシュの削除には、方法が3つ。
//ディスク、メモリのキャッシュを削除
SDImageCache.shared.clearMemory()
SDImageCache.shared.clearDisk(onCompletion: nil)

//指定URLのキャッシュを削除
SDImageCache.shared.removeImage(forKey: "画像URL", withCompletion: nil)
ローカル上のキャッシュを全て削除するか、URLで指定した画像のキャッシュのみを削除するか。
自分のプロフィール画像だけならURLで指定すればいいですが、他ユーザーの画像を多数使用するなら、0から画像をダウンロードする処理が増えるので、下手に全キャッシュを削除しない方が良いかと。
キャッシュの更新は、ImageViewなどに画像をセットするときに、optionで.refreshCachedと指定するだけです。
//キャッシュを更新し、指定URLの画像をセット
imageView.sd_setImage(with: 画像URL, placeholderImage: nil, options: SDWebImageOptions.refreshCached, context: nil)
もしURL先の画像が変更されてたら、古いキャッシュを消して、新しい画像のキャッシュを取り込んで表示してくれます。
ソースコード
//ディスク、メモリのキャッシュを削除
SDImageCache.shared.clearMemory()
SDImageCache.shared.clearDisk(onCompletion: nil)

//指定URLのキャッシュを削除
SDImageCache.shared.removeImage(forKey: "画像URL", withCompletion: nil)

//キャッシュを更新し、指定URLの画像をセット
imageView.sd_setImage(with: 画像URL, placeholderImage: nil, options: SDWebImageOptions.refreshCached, context: nil)
参考
【Swift】画面を全て閉じて、ホーム画面に戻る
どうも、ねこきち(@nekokichi1_yos2)です。
今開いている画面を全て閉じて、ホーム画面(もしくは初期画面)へ1発で戻りたい場合があります。
かといって、
- dismissを多用する → 処理の流れが複雑に
- ホーム画面に遷移する → 画面が生成され、処理が圧迫される
の問題点が。
そこで、生成された画面を全て閉じて、最初の画面(ホーム画面)に戻る方法を書いていきます。
解説
方法は
- RootViewController
- presentingViewController
- unWindSegue
を使った3つです。
RootViewController
RootViewControllerはアプリ画面の初期画面(アプリ起動時、最初に表示されるViewController ) 。
RootViewControllerでdismissを発動させると、RootViewController以降に開かれた画面(生成されたViewController)を全て削除する。
self.view.window?.rootViewController?.dismiss(animated: true, completion: nil)
結果、1番最初の画面に戻れる。
ドキュメントによると、
If you present several view controllers in succession, thus building a stack of presented view controllers, calling this method on a view controller lower in the stack dismisses its immediate child view controller and all view controllers above that child on the stack.
複数のビューコントローラーを連続して提示し、提示されたビューコントローラーのスタックを構築する場合、スタックの下位にあるビューコントローラーでこのメソッドを呼び出すと、その直接の子ビューコントローラーと、スタック上のその子より上のすべてのビューコントローラーが閉じます。
引用:Appleドキュメントより
https://developer.apple.com/documentation/uikit/uiviewcontroller/1621505-dismiss
なので、親であるRootViewControllerより上の、子であるViewController達を削除するってことかな?
presentingViewController
開いている画面を指定して、直接閉じる方法。
self.presentingViewController?.dismiss(animated: true, completion: nil)
注意点として、rootViewController(アプリ起動時の画面)から1つの画面が開かれている場合、
self.presentingViewController?.presentingViewController?.dismiss(animated: true, completion: nil)
と指定しないと、RootViewControllerには戻れない。
もし1つだけだと、現在表示している画面しか閉じない。

なので、
- 現在の画面とRootViewControllerの間にある画面の数 + 1
を指定した方がいい。
unWindSegue
Segueを利用した方法。
@IBAction func unwindSegue(for unwindSegue: UIStoryboardSegue, towards subsequentVC: UIViewController) {}
手順は、
- 1番最初の画面(ホーム画面)に上記のメソッドを記述
- StoryBoardで処理を実行したいUI(例:UIButton)をcontrolキーを押下しながらExitと紐づける
- 1番最初の画面で定義したメソッドを選択
(★ここ重要)unWindSegueは、unWindSegueのメソッドを定義した画面に戻るので、もしホーム画面に戻るなら、ホーム画面に記述する。
(2:UIとExitの紐付け)
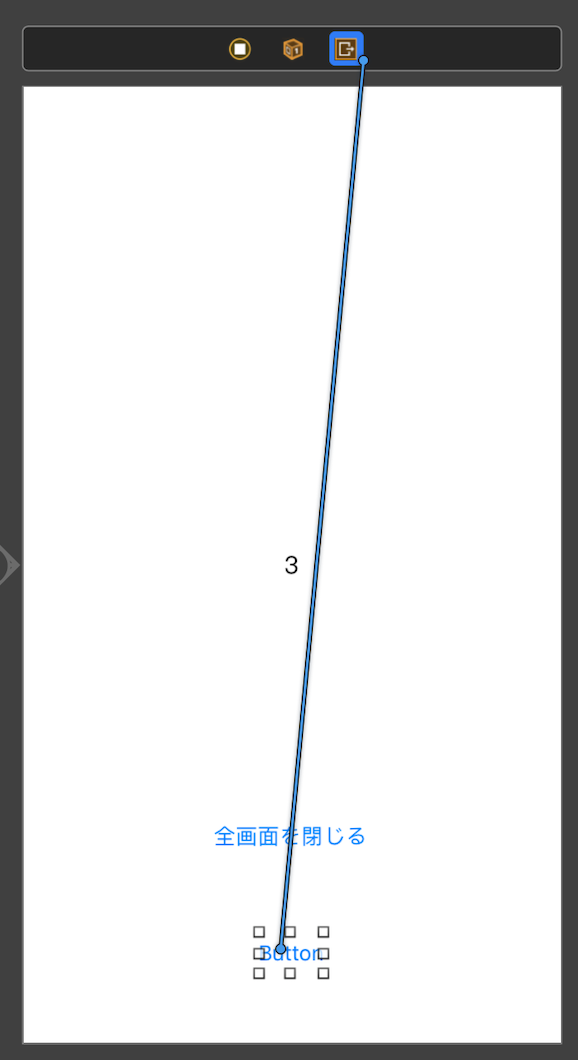
(3:戻り先で定義したunWindSegueのメソッドを選択)

結果
StoryBoard
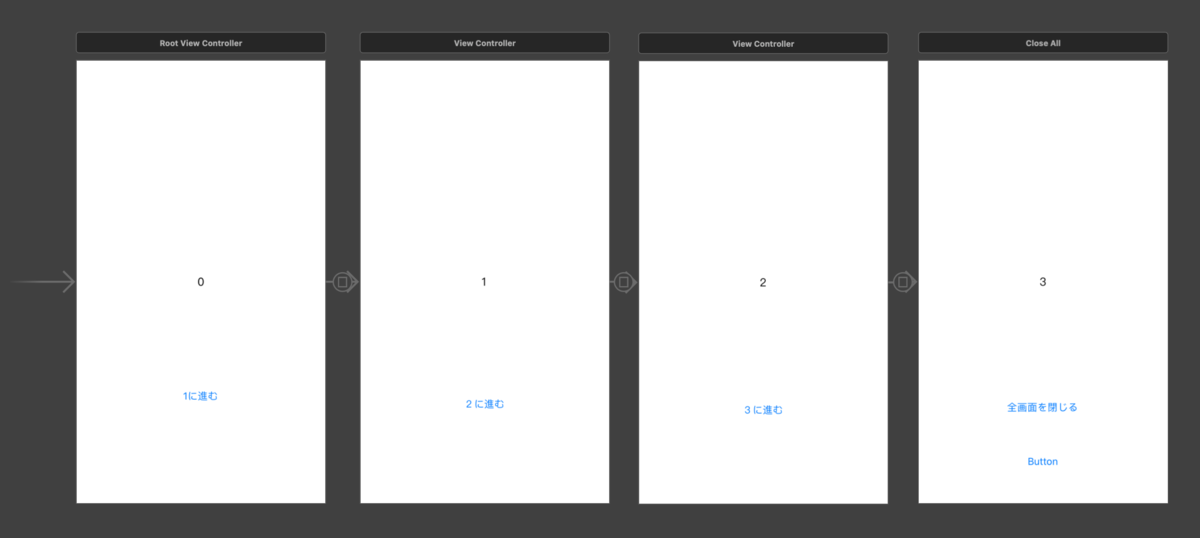
(CloseAll - 4つ目の画面 - ButtonはExitでunWindSegueのメソッドと紐付け)
dismissの場合

unwindSegueの場合
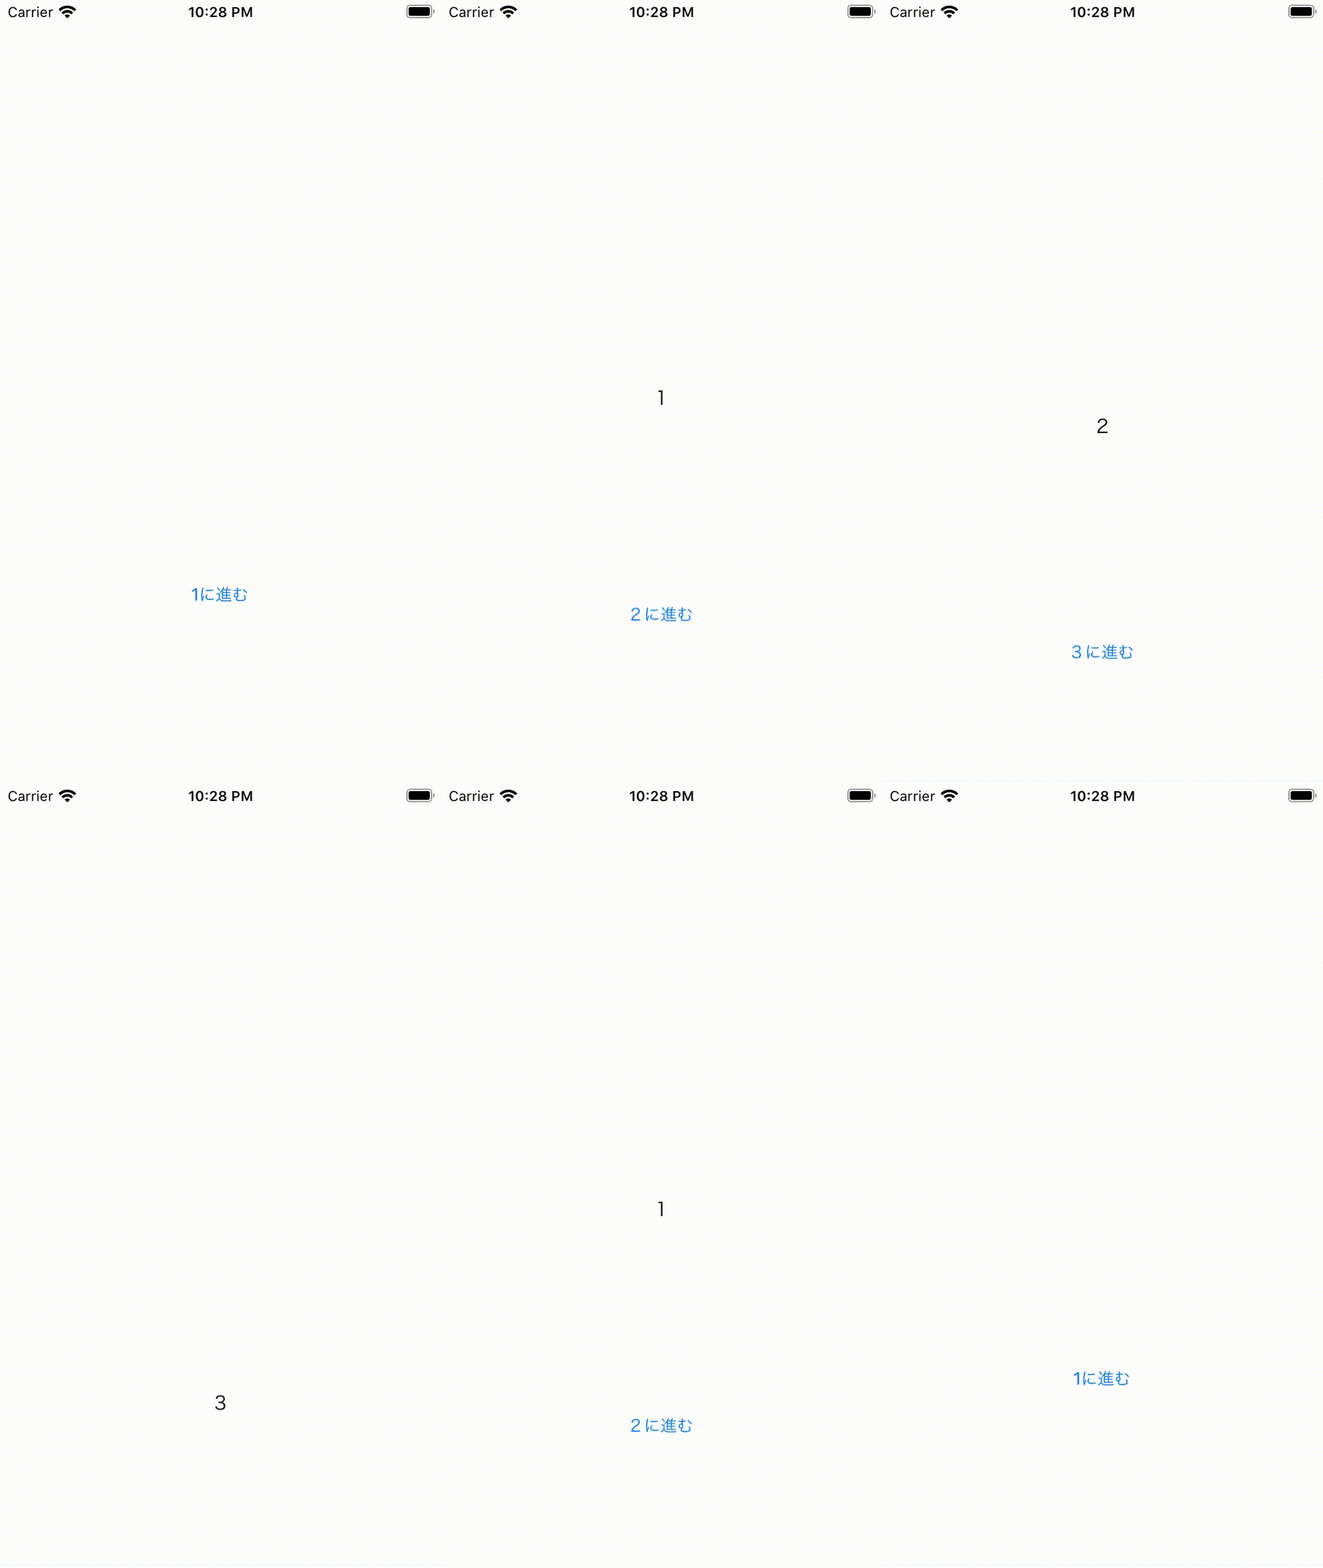
ソースコード
rootViewController(最初の画面)
import UIKit

class rootViewController: UIViewController {

    @IBAction func unwindSegue(for unwindSegue: UIStoryboardSegue, towards subsequentVC: UIViewController) {
    }

}
closeAll(4つ目の画面)
import UIKit

class CloseAll: UIViewController {

    @IBAction func closeAllViewController(_ sender: Any) {
        self.view.window?.rootViewController?.dismiss(animated: true, completion: nil)
        self.presentingViewController?.presentingViewController?.presentingViewController?.dismiss(animated: true, completion: nil)
    }

}
参考
【Swift】NavigationBarにBarButtonを追加
どうも、ねこきち(@nekokichi1_yos2)です。
NavigationBarにBarButtonを追加します。
解説
UIBarButtonを代入し、
- title(ボタンの文字)
- style(ボタンの種類)
- target(処理の対象?)
- action(ボタン押下時の処理)
を設定します。
styleには、
- plain
- done
の2種類があり、役割が違うそうです。
let leftback = UIBarButtonItem(title: "キャンセル", style: .plain, target: self, action: #selector(back))
(参考)
ボタンの追加は、ViewControllerに組み込まれているNavigationControllerのBarButton(右か左)を指定し、先ほど作ったボタンを代入します。
self.navigationItem.leftBarButtonItem = leftback
ただし、右と左の両方にBarButtonを設置する場合、注意点があります。
1つのBarButtonで右と左の位置に配置すると、最後に指定した方だけに配置されてしまいます。
let leftback = UIBarButtonItem(title: "キャンセル", style: .plain, target: self, action: #selector(back))

self.navigationItem.leftBarButtonItem = leftback
self.navigationItem.rightBarButtonItem = leftback

なので、右と左にBarButtonを配置するなら、2個作りましょう。
結果

ソースコード
import UIKit

class navigation: UIViewController {

    override func viewDidLoad() {
        super.viewDidLoad()

        //ボタンを生成
        let leftback = UIBarButtonItem(title: "キャンセル", style: .plain, target: self, action: #selector(back))
        let rightback = UIBarButtonItem(title: "キャンセル", style: .plain, target: self, action: #selector(back))

        //ボタンを追加
        self.navigationItem.leftBarButtonItem = leftback
        self.navigationItem.rightBarButtonItem = rightback
    }

    @objc func back() {
        self.navigationController?.popViewController(animated: true)
    }

}