【Swift】GeccoでスポットライトなUIを実現
どうも、ねこきち(@nekokichi1_yos2)です。
アプリの初回起動時、チュートリアルが流す場合、ユーザーにUIの説明をする必要があります。
その際、スポットライトでUIを照らして、テキストで説明するチュートリアルをたまに見かけます。

(参考:https://www.mobile-patterns.com/coach-marks)
そこで今回は、スポットライトを表示させるライブラリ - Gecco - の実装方法を書いていきます。
注意
Geccoは4,5年前にGitHubでの更新が止まっているので、今の環境で動くかどうか保証はできません。
本記事を投稿した時点では問題なくビルドできましたが、今後のSwiftやXcodeのバージョンアップでエラーが起こる可能性があるかもしれないことにご注意を。
解説
手順は、下記の4つ。
- Geccoを導入
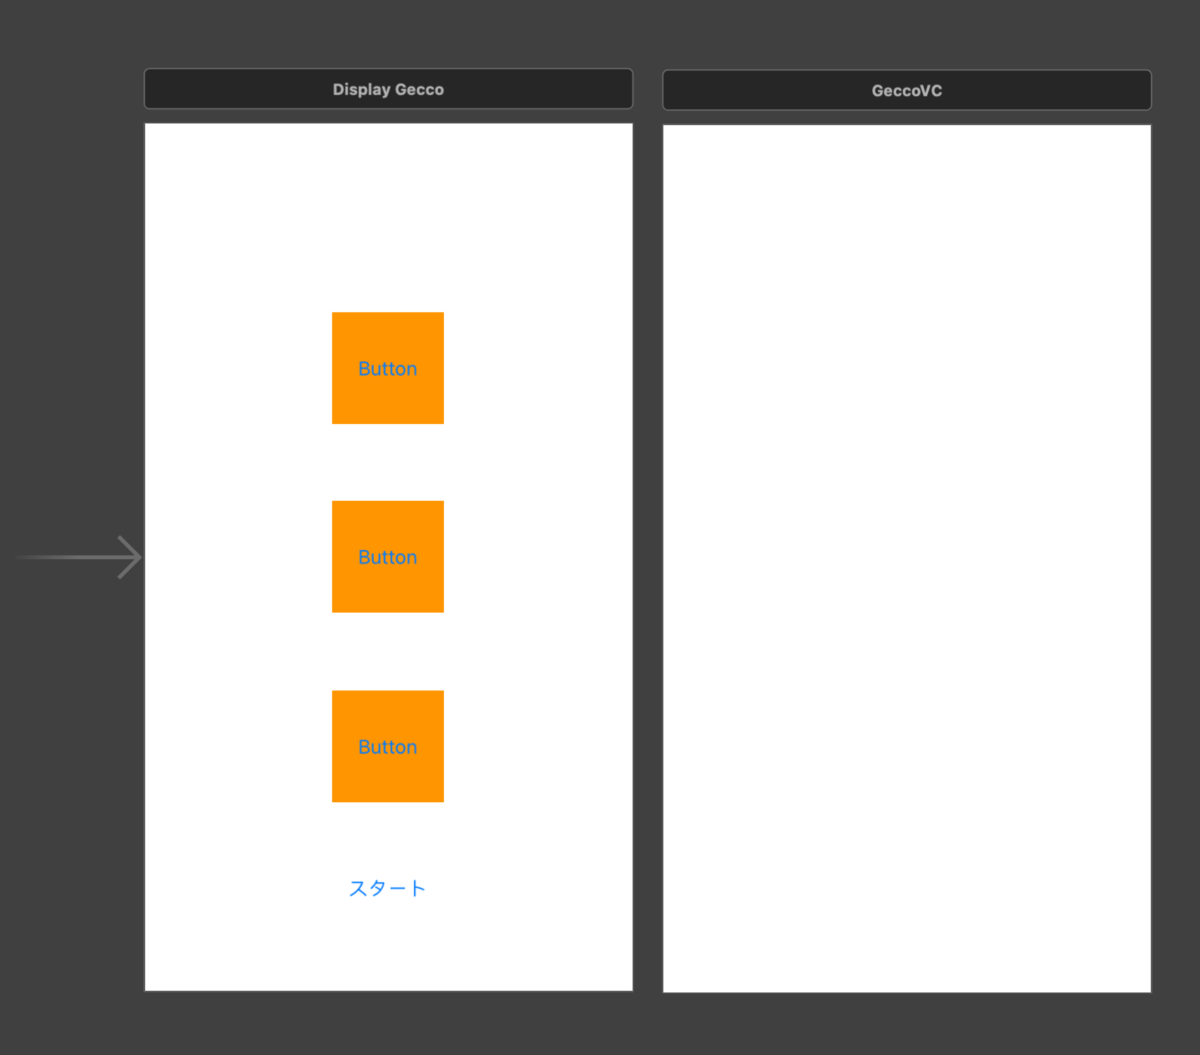
- 2つのViewControllerを作る
- スポットライトとテキストを用意
- スポットライトとテキストアニメーションを設定
Geccoを導入
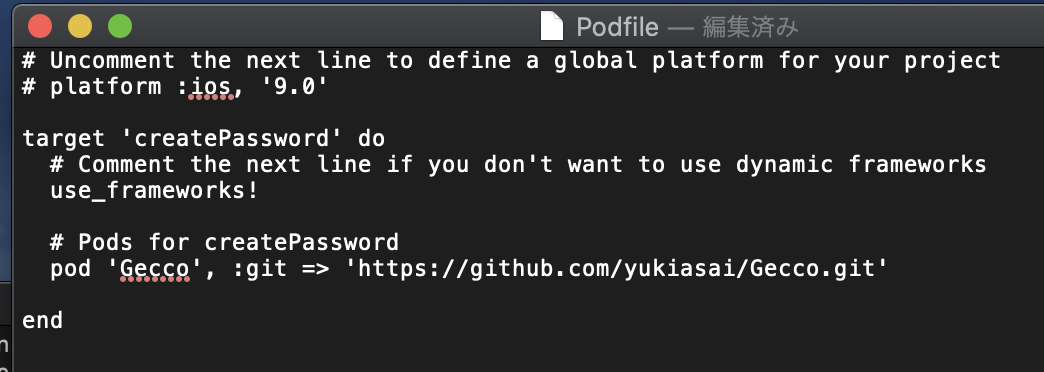
podfile経由でインストール。
↓

2つのViewControllerを作る
Geccoの実装に必要なのは、
- Geccoの設定(スポットライトの位置や表示設定など)
- Geccoの実装(スポットライトを表示させる)
の2つ。
今回は、設定用をGeccoVCとして、
(クラスは、SpotlightViewController、と定義してください。)
import UIKit
import Gecco

class GeccoVC: SpotlightViewController {

    //各UILabelの座標データ
    var uiLabels_frames = [CGRect()]
    //画面サイズ
    let screenSize = UIScreen.main.bounds.size

}
実装用をDisplayGeccoとします。
(先に、スポットライトで指し示すUIを用意しておきます。)
import UIKit

class DisplayGecco: UIViewController {

    @IBOutlet weak var button1: UIButton!
    @IBOutlet weak var button2: UIButton!
    @IBOutlet weak var button3: UIButton!

}
DisplayGeccoではGeccoを実行するコードを書き、GeccoVCではスポットライトやテキストを表示するのに必要な設定を施していきます。
スポットライトとテキストを用意
まず、必要なのは、
- スポットライトのframe
- スポットライトを進行させるためのdelegate
- テキストを生成
- テキストを表示させる処理
の4つ。
スポットライトのframe
スポットライトでUIを照らすので、そのUIの座標を取得する必要があります。
よって、DisplayGeccoのUIButtonを指し示すので、
- 各UIButtonの座標を取得
- GeccoVCに渡す
- スポットライトを生成
を実行します。
各UIButtonのCGRectを配列に格納し、
  func passCGRect() -> [CGRect] {
        var arrayCGRect = [CGRect]()
        arrayCGRect.append(button1.frame)
        arrayCGRect.append(button2.frame)
        arrayCGRect.append(button3.frame)
        return arrayCGRect
    }
その配列を、StoryBoardのインスタンスで GeccoVCに渡します。
let geccoVC = UIStoryboard(name: "Main", bundle: nil).instantiateViewController(withIdentifier: "Gecco") as! GeccoVC
geccoVC.uiLabels_frames = passCGRect()
受け取った座標を元に、スポットライトを生成。
(spotlightView.apperは、最初に表示されるスポットライト)
spotlightView.appear(Spotlight.RoundedRect(center: CGPoint(x: uiLabels_frames[0].midX, y: uiLabels_frames[0].midY), size: CGSize(width: uiLabels_frames[0].width + 40, height: uiLabels_frames[0].height + 40), cornerRadius: 50))
次に表示させるスポットライトを生成。
(spotlightMoveは、次に表示されるスポットライト、指定した座標にスポットライトが移動する)
func spotlightMove(_ cgpoint:CGPoint, _ cgsize:CGSize) {
    spotlightView.move(Spotlight.RoundedRect(center: cgpoint, size: cgsize, cornerRadius: 50))
}
spotlightMove(CGPoint(x: uiLabels_frames[1].midX, y: uiLabels_frames[1].midY), CGSize(width: uiLabels_frames[1].width + 40, height: uiLabels_frames[1].height + 40))
spotlightMove(CGPoint(x: uiLabels_frames[2].midX, y: uiLabels_frames[2].midY), CGSize(width: uiLabels_frames[2].width + 40, height: uiLabels_frames[2].height + 40))
スポットライトを進行させるためのdelegate
次に、スポットライトのアニメーションの実行/解除、を設定します。
GeccoVCでSpotlightViewControllerDelegateを記述。
extension GeccoVC: SpotlightViewControllerDelegate {
    //画面が表示される時
    func spotlightViewControllerWillPresent(_ viewController: SpotlightViewController, animated: Bool) {
    }
    //画面タップ時
    func spotlightViewControllerTapped(_ viewController: SpotlightViewController, isInsideSpotlight: Bool) {
    }
    //画面が消える時
    func spotlightViewControllerWillDismiss(_ viewController: SpotlightViewController, animated: Bool) {
        spotlightView.disappear()
    }
}
今回は、画面をタップするたびにスポットライトを表示させていくので、下記のメソッドを用意。
(実行されるたびに、updateIndexが加算され、3つのスポットライトが順番に表示され、最後にスポットライトが消える)
(終了後にupdteIndexは初期化されるので、再び実行すればスポットライトが表示される)
    func nextSpotlight() {

        switch updateIndex {
        case 0:
            spotlightView.appear(Spotlight.RoundedRect(center: CGPoint(x: uiLabels_frames[0].midX, y: uiLabels_frames[0].midY), size: CGSize(width: uiLabels_frames[0].width + 40, height: uiLabels_frames[0].height + 40), cornerRadius: 50))
        case 1:
            spotlightMove(CGPoint(x: uiLabels_frames[1].midX, y: uiLabels_frames[1].midY), CGSize(width: uiLabels_frames[1].width + 40, height: uiLabels_frames[1].height + 40))
        case 2:
            spotlightMove(CGPoint(x: uiLabels_frames[2].midX, y: uiLabels_frames[2].midY), CGSize(width: uiLabels_frames[2].width + 40, height: uiLabels_frames[2].height + 40))
        case 3:
            dismiss(animated: true, completion: nil)
        default:
            break
        }

        updateIndex += 1
    }
上記のメソッドをdelegateのメソッド内に記述。
    func spotlightViewControllerWillPresent(_ viewController: SpotlightViewController, animated: Bool) {
        nextSpotlight()
    }
    //画面タップ時
    func spotlightViewControllerTapped(_ viewController: SpotlightViewController, isInsideSpotlight: Bool) {
        nextSpotlight()
    }
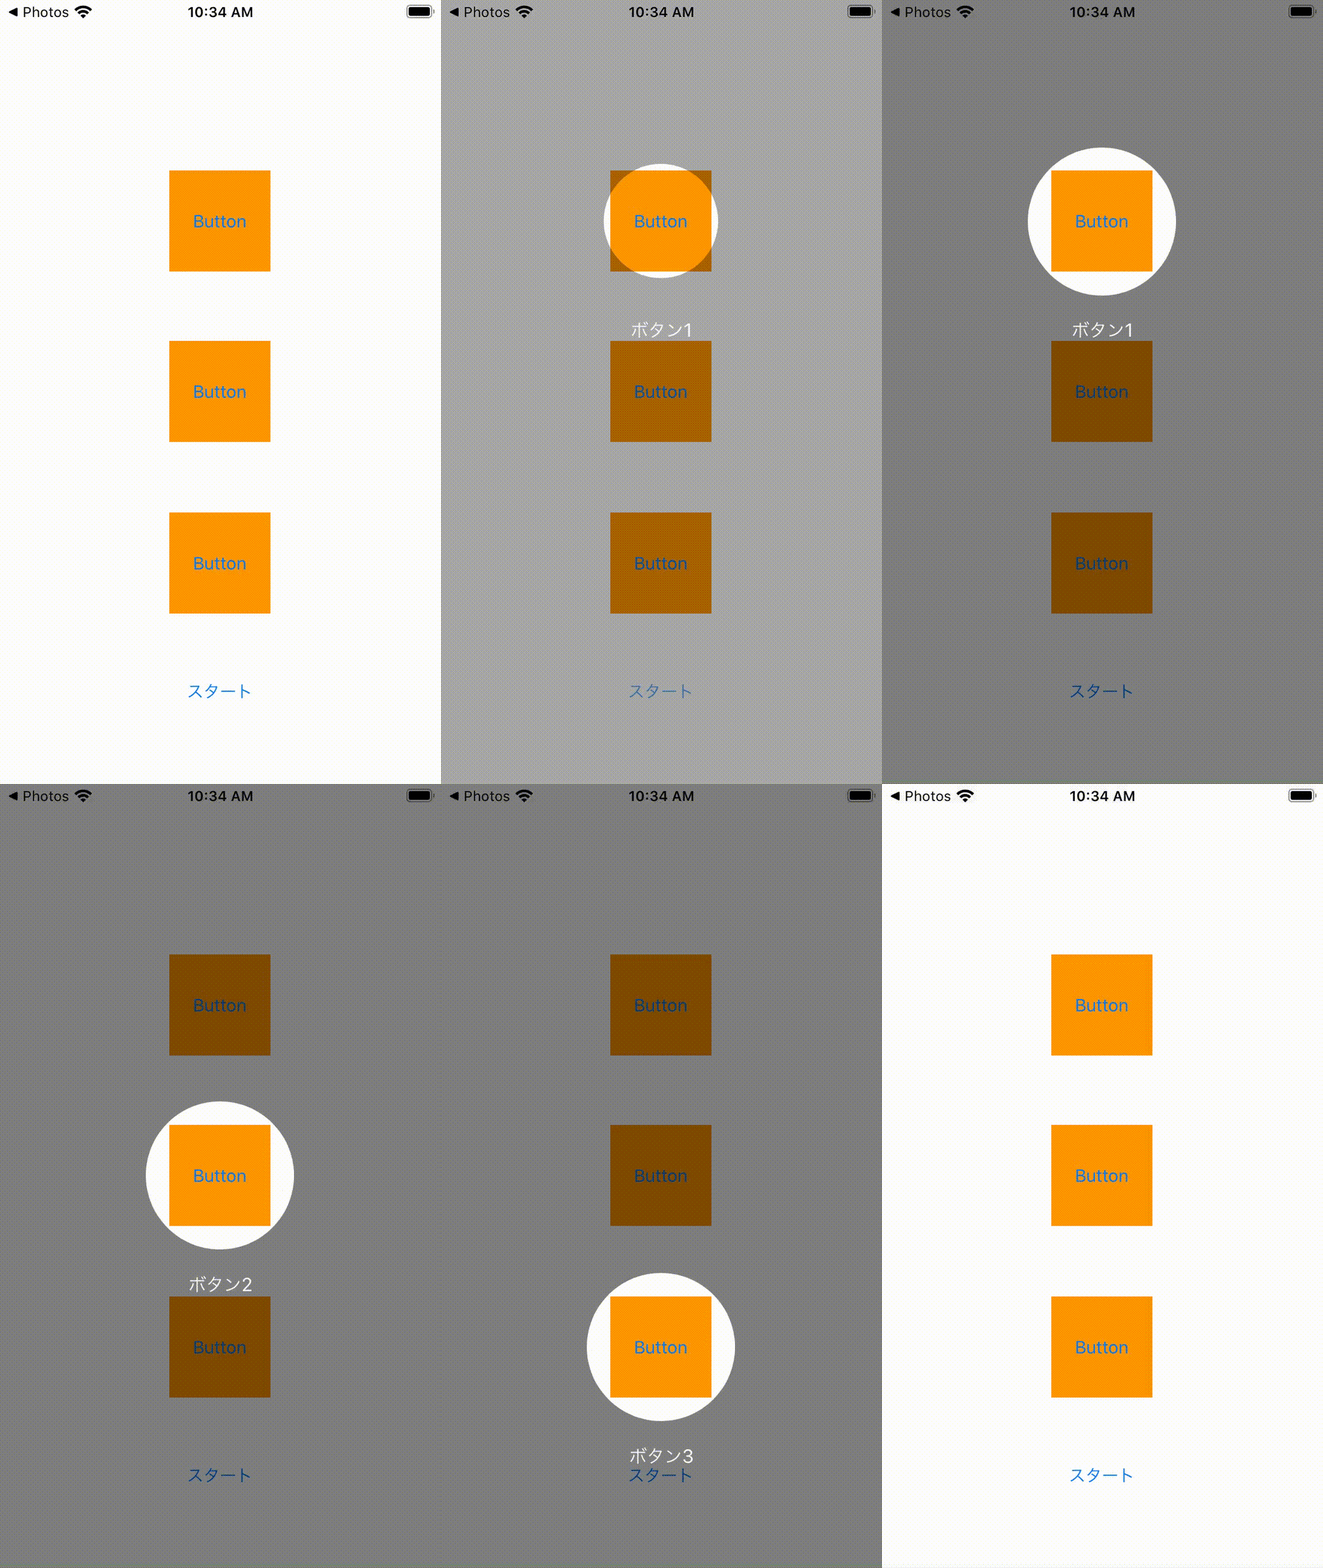
これで、下記の処理が実装できました。
- GeccoVCが開く→1つ目のスポットライト
- 画面をタップ→2つ目のスポットライト
- 画面をタップ→3つ目のスポットライト
- 画面をタップ→スポットライトのアニメーションが終了
テキストの生成
とりあえず、下記のコードでスポットライトと一緒に表示させるテキストを3つ生成します。
また、各テキストの座標はUIButtonの座標の近くに表示させるので、取得したUIButtonの座標を元にframeを指定します。
    var uiLabels = [UIView]()

    override func viewDidLoad() {
        super.viewDidLoad()
        delegate = self
        //使用するラベルは3つなので、0...2
        for index in 0...2 {
            createLabels(index)
        }
    }

    //メッセージ用のUILabelを生成
    func createLabels(_ index:Int) {
        let label = UILabel()
        switch index {
        case 0:
            label.text = "ボタン1"
        case 1:
            label.text = "ボタン2"
        case 2:
            label.text = "ボタン3"
        default:
            break
        }
        //labelの設定
        label.textColor = .white
        label.font = UIFont.systemFont(ofSize: 16)
        label.textAlignment = .center
        label.numberOfLines = 0
        label.frame = CGRect(x: 0, y: uiLabels_frames[index].origin.y + uiLabels_frames[index].height + 20, width: screenSize.width, height: 60)
        self.view.addSubview(label)
        //uiLabelsに格納
        uiLabels.append(label)
    }

テキストのアニメーションを設定
まずは、下記のメソッドを定義。
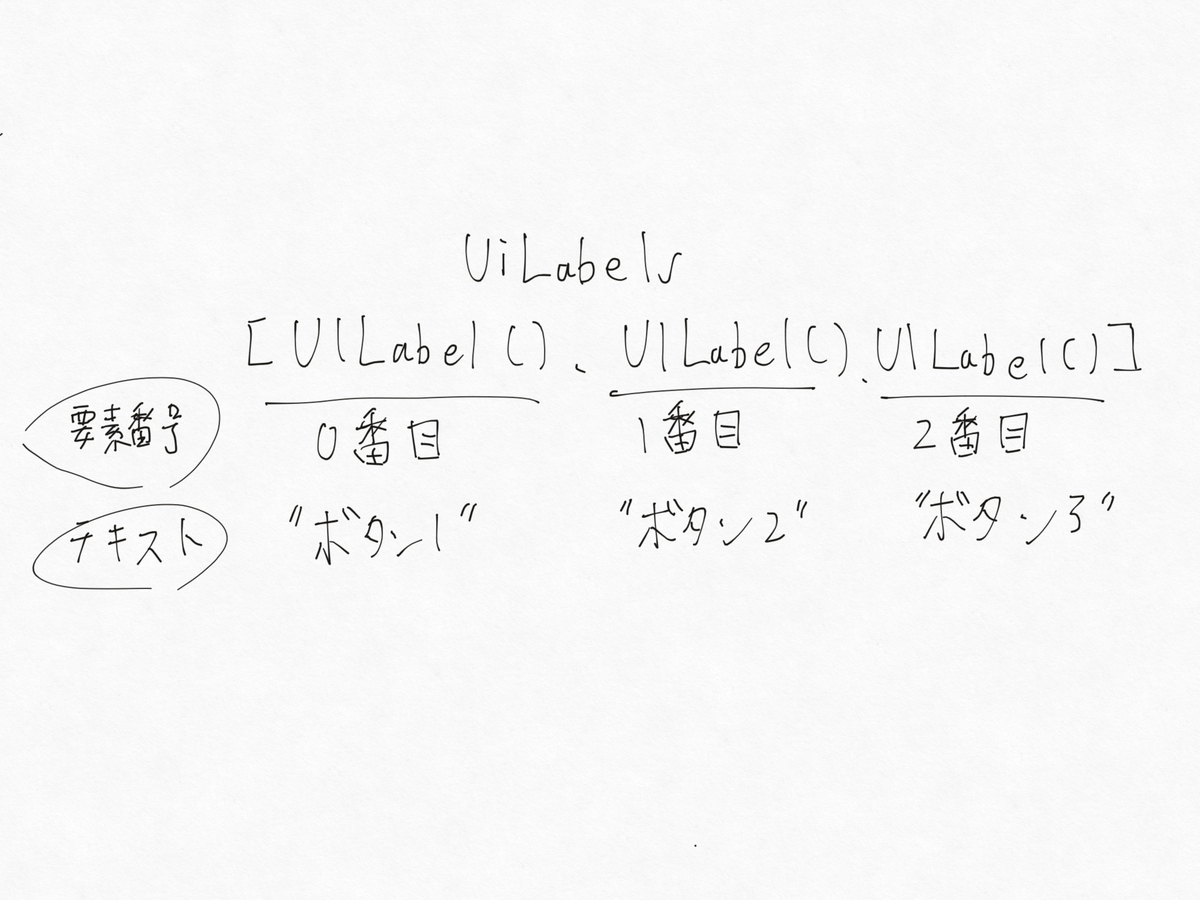
(viewは格納したUILabel、indexは要素番号)
(後ほど、解説します。)
    func updateSpotlightLabel(_ labelAnimated: Bool) {
        uiLabels.enumerated().forEach { index, view in
            UIView.animate(withDuration: labelAnimated ? 0.25 : 0) {
                view.alpha = index == self.updateIndex ? 1 : 0
            }
        }
    }
スポットライトと同時に表示させるので、上記のメソッドをnextSpotlightの中に記述。
var updateIndex = 0
func nextSpotlight(_ spotAnimated: Bool) {
     updateSpotlightLabel(spotAnimated) updateIndex += 1
}
updateSpotlightLabelのメソッドは、
- 生成したUILabelを全て表示
- updateIndexに対応するテキストのみを表示(それ以外は非表示)
の仕組みで動いてます。
つまり、updateIndexの値に対して、
- 0 : button1、label("ボタン1")
- 1 : button2、label("ボタン2")
- 2 : button3、label("ボタン3")
のように対応しており、updateIndexの各値に対応するテキストのみを表示しているのです。
↓

スポットライトとテキストを表示
そして最後は、GeccoVCをpresentで表示させれば、スポットライトのアニメーションが開始されます。
let geccoVC = UIStoryboard(name: "Main", bundle: nil).instantiateViewController(withIdentifier: "Gecco") as! GeccoVC
self.present(geccoVC, animated: true, completion: nil)
結果

ソースコード
「ストーリーボード」

「DisplayGecco」
import UIKit

class DisplayGecco: UIViewController {

    @IBOutlet weak var button1: UIButton!
    @IBOutlet weak var button2: UIButton!
    @IBOutlet weak var button3: UIButton!

    func passCGRect() -> [CGRect] {
        var arrayCGRect = [CGRect]()
        arrayCGRect.append(button1.frame)
        arrayCGRect.append(button2.frame)
        arrayCGRect.append(button3.frame)
        return arrayCGRect
    }

    @IBAction func start(_ sender: Any) {
        let geccoVC = UIStoryboard(name: "Main", bundle: nil).instantiateViewController(withIdentifier: "Gecco") as! GeccoVC
        geccoVC.alpha = 0.5
        //GeccoVCのスポットライトやテキストに必要な座標データを渡す
        geccoVC.uiLabels_frames = passCGRect()
        //移行
        self.present(geccoVC, animated: true, completion: nil)
    }

}
「GeccoVC」
import UIKit
import Gecco

class GeccoVC: SpotlightViewController {

    //UILabelを格納
    var uiLabels = [UIView]()
    //各UILabelの座標データ
    var uiLabels_frames = [CGRect()]
    //LabelやSpotlightの表示を決める
    var updateIndex = 0
    //画面サイズ
    let screenSize = UIScreen.main.bounds.size


    override func viewDidLoad() {
        super.viewDidLoad()
        delegate = self
        for index in 0...2 {
            createLabels(index)
        }
    }

    //メッセージ用のUILabelを生成
    func createLabels(_ index:Int) {
        let label = UILabel()
        switch index {
        case 0:
            label.text = "ボタン1"
        case 1:
            label.text = "ボタン2"
        case 2:
            label.text = "ボタン3"
        default:
            break
        }
        label.textColor = .white
        label.font = UIFont.systemFont(ofSize: 16)
        label.textAlignment = .center
        label.numberOfLines = 0
        label.frame = CGRect(x: 0, y: uiLabels_frames[index].origin.y + uiLabels_frames[index].height + 20, width: screenSize.width, height: 60)
        self.view.addSubview(label)
        uiLabels.append(label)
    }

    //Spotlightを表示
    func nextSpotlight(_ spotAnimated: Bool) {

        updateSpotlightLabel(spotAnimated)

        switch updateIndex {
        case 0:
            spotlightView.appear(Spotlight.RoundedRect(center: CGPoint(x: uiLabels_frames[0].midX, y: uiLabels_frames[0].midY), size: CGSize(width: uiLabels_frames[0].width + 40, height: uiLabels_frames[0].height + 40), cornerRadius: 50))
        case 1:
            spotlightMove(CGPoint(x: uiLabels_frames[1].midX, y: uiLabels_frames[1].midY), CGSize(width: uiLabels_frames[1].width + 40, height: uiLabels_frames[1].height + 40))
        case 2:
            spotlightMove(CGPoint(x: uiLabels_frames[2].midX, y: uiLabels_frames[2].midY), CGSize(width: uiLabels_frames[2].width + 40, height: uiLabels_frames[2].height + 40))
        case 3:
            dismiss(animated: true, completion: nil)
        default:
            break
        }

        updateIndex += 1
    }

    //Spotlightを処理
    func spotlightMove(_ cgpoint:CGPoint, _ cgsize:CGSize) {
        spotlightView.move(Spotlight.RoundedRect(center: cgpoint, size: cgsize, cornerRadius: 50))
    }

    //UILabelを表示
    func updateSpotlightLabel(_ labelAnimated: Bool) {
        uiLabels.enumerated().forEach { index, view in
            UIView.animate(withDuration: labelAnimated ? 0.25 : 0) {
                view.alpha = index == self.updateIndex ? 1 : 0
            }
        }
    }

}

extension GeccoVC: SpotlightViewControllerDelegate {
    func spotlightViewControllerWillPresent(_ viewController: SpotlightViewController, animated: Bool) {
        nextSpotlight(false)
    }

    func spotlightViewControllerTapped(_ viewController: SpotlightViewController, isInsideSpotlight: Bool) {
        nextSpotlight(true)
    }

    func spotlightViewControllerWillDismiss(_ viewController: SpotlightViewController, animated: Bool) {
        spotlightView.disappear()
    }
}
参考